In today’s digital world, videos play a very important role in preserving memories, sharing information, and creating professional content. You can easily save your video files on multiple devices, including your smartphones or PCs.
Your videos help showcase outfits, share trends, and connect your style with your audience. But videos that are blurry, shaky, or corrupted can hurt engagement and reduce viewer trust. Whether you are creating Instagram Reels, TikTok clips, or YouTube lookbooks, clear and sharp videos make your fashion content stand out and perform better.
The good news is you do not need advanced technical skills to fix or improve your video quality. There are simple tools and techniques that help repair blurry or damaged video files and make your fashion content look professional. In this guide, we will share easy and practical ways to fix your videos and improve clarity so your fashion stories shine online.
Understanding Why Videos Get Blurry or Damaged
Before diving into adequate methods to video file repair, it’s important to find the exact reason behind your damaged or blurry video files. Some of the common reasons include:
- Low Camera Resolution: Recording videos with low resolution or incorrect focus reduces visual detail, making them appear soft, unclear, and lacking sharpness during playback.
- Low Light Conditions: If your video is recorded in insufficient lighting, it forces cameras to increase sensitivity, producing digital noise, grain, reduced clarity, and visible distortion across frames.
- Interrupted File Transfers: Unstable internet or sudden interruption while transferring video file damaged its structure, causing missing frames, playback errors, or incomplete video data.
- Storage Device Errors: Bad sectors on storage devices prevent proper data access, leading to damaged videos, missing parts, or unreadable media files.
Once you identify the exact reason for your damaged video files, choosing the right solution becomes much easier.
How to Fix Damaged Video Files Instantly? [Quick Tips]
Irrespective of the aforementioned reasons for your blurry or damaged video files, there are several effective tips you can follow to repair blurry videos and improve video clarity. Let’s discuss a few of these video repair fixes in detail:
Tip 01: Try Video Enhancement Software
Let’s begin with the simplest approach first. If your videos appear blurry or damaged, try video enhancement or repair software to fix them. Many video repair tools like Stellar Repair for Video are designed to automatically analyse video frames and improve sharpness, clarity, and overall quality. These tools basically help in:
- Increasing video resolution
- Reducing blur and motion shake
- Improving brightness, contrast, and colour balance
- Reducing noise and grain, or
- Repairing damaged or unplayable video files
Tip 02: Stabilise Shaky Footage
Camera shake during recording is one of the main reasons why videos appear blurry. Even small shakes can cause motion blur, especially in handheld recordings. To avoid such issues:
- Use built-in stabilisation features offered in many editing tools such as Adobe Premiere Pro, Final Cut Pro, or DaVinci Resolve.
- Some popular mobile apps like CapCut, InShot, and VN Editor offer one-tap stabilisation.
- Use a tripod, gimbal, or phone stabiliser to prevent shaking or blurry footage from your end.
Tip 03: Improve Focus and Sharpness
Your videos may appear blurry if the camera hasn’t focused properly. This mainly happens while recording fast-moving subjects or switching between foreground and background objects. Here are quick fixes to enhance focus:
- Use manual focus during editing if possible.
- Apply a sharpening filter carefully. Also, avoid over-sharpening as it can introduce noise.
- Configure edge sharpness rather than global sharpness for better results.
Tip 04: Adjust Brightness and Contrast
If your video appears blurry due to poor lighting, increasing ISO or lowering shutter speed can help to improve its quality. For this, you can configure the following changes:
- Increase the brightness of your video.
- Adjust contrast to define edges more clearly.
- Modify highlights and shadows to balance exposure.
Tip 05: Reduce Noise and Grain
Noise often generates grainy distortion, especially in low-light videos. Videos with excessive noise look blurry or may degrade their quality. In such cases:
- Apply noise reduction filters before sharpening your video files.
- Try removing colour noise first, then luminance noise.
- Balance noise reduction carefully to avoid losing detail.
Tip 06: Check Export and Playback Settings
Sometimes the video seems fine, but it appears grainy due to incorrect export or playback settings. For this:
- You can use a high bitrate during export to preserve detail.
- Avoid excessive compression.
- Check your media player settings—some players default to lower-quality playback.
Additional Tip: Step-by-Step Guide to Fix Blurry Videos Online
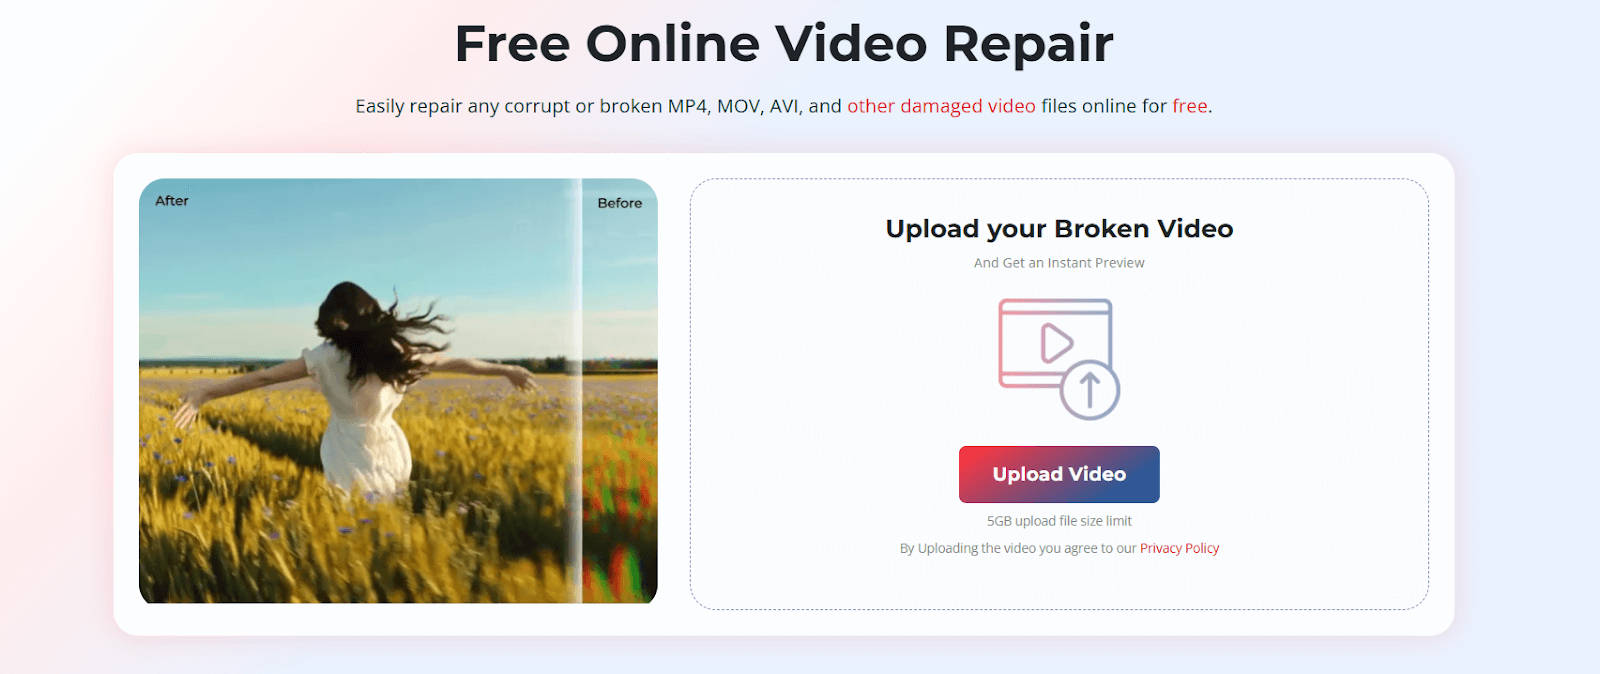
Blurriness not only affects your video quality, they ruin the entire video streaming experience. If your video appears blurry, it’s important to immediately proceed with the video repair fixes. Along with the manual video repair methods and third-party software tools, some online tools like Stellar Repair for Video Online allow you fix blurry or damaged videos instantly. This online tool can help you repair videos directly from the web browser, i.e., there’s no need to install any third-party software tools.
The Stellar Repair for Video Online tool supports repairing video files of various file formats, such as MP4, MOV, AVI, MKV, and others. You can use this tool to easily fix blurry videos recorded on smartphones, digital cameras, drones, CCTV systems, and DSLRs. This software also lets you preview the repaired video files before saving them on your device.
Here’s how to repair blurry videos instantly using the Stellar Repair for Video Online tool:
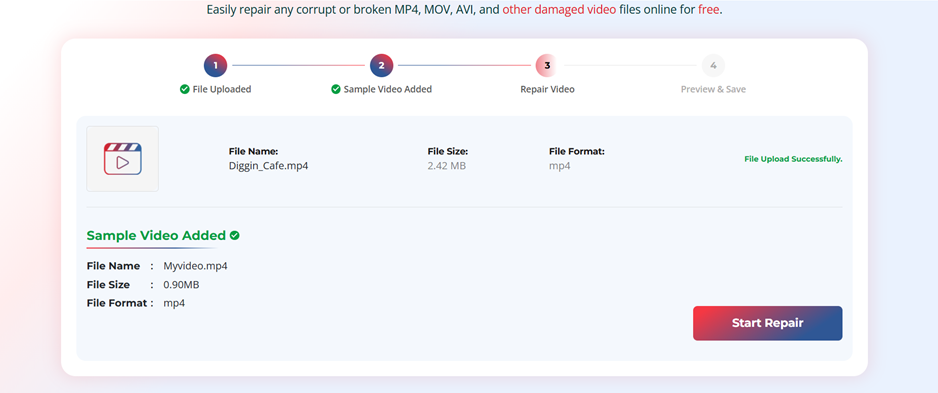
Step 1: Visit the official website of the Stellar Repair for Video Online tool. From the homepage, click Upload Video to add the blurry video files you need to repair.
Step 2: Once the files are uploaded, add a sample video file (recorded with the same device and must have the same file format). Click Start Repair and wait till the tool fixes the corruption that contributes to blur and distortion.
Step 3: After the repair is complete, preview the restored video. If the results meet your expectations, click Save Repaired Video to download the fixed file to your device.
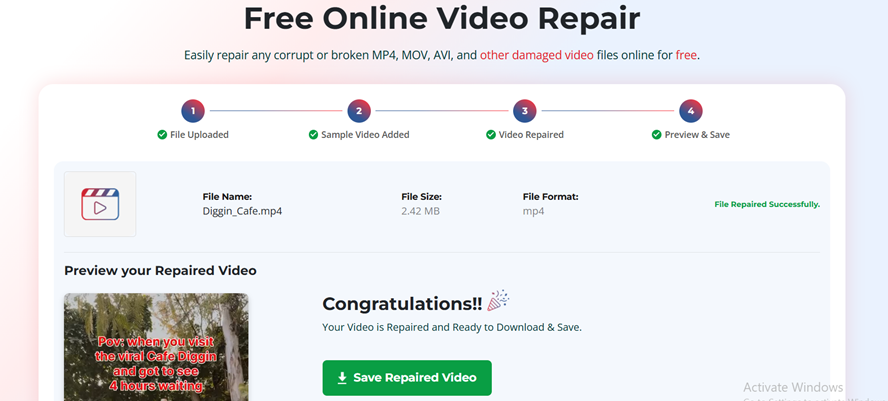
That’s it! By following these simple steps, you can quickly restore clarity and enjoy a smoothly repaired video without any technical hassle.
Wrapping Up
Great fashion influencer content relies on strong visuals and clear storytelling. Blurry or damaged videos can distract your audience and weaken your brand voice. By identifying the cause of the issue and using the right tools and tips to improve video clarity, you can make sure your style, trends, and moments are captured beautifully. Following these fixes will help you deliver higher quality fashion videos that engage viewers and boost your performance across social platforms.